Tw5-node-red continued

First, would like to acknowledge the patience of the TiddlyWiki community as I have been developing the TW5-Node-Red application over the past months (years?). But finally coming along to a publishable project.

This project has been years in the making, and is finally coming to bear fruit.

Also, please excuse the sizing of images below - know they are inconsistent, grrr…

If you wish to follow along the daily updates - the current code base is in ‘tw5-pocket-io’ but upon release (Jun-Jul 2025) will be ‘tw5-node-red’-

First will need to install Node-Red and start it up once. Node-Red generates default stuff that is used by the system. See Running Node-RED locally : Node-RED - then -

https://github.com/PotOfCoffee2Go/tw5-pocket-io.git
cd tw5-pocket-io
npm install

My TW5-Node-Red project has been going thru a long process. Instead of attempting to describe how it works, will show images of the app startup - which gives an idea of what it does. This project will finaaly become the ‘tw5-node-red’ project upon initial release.

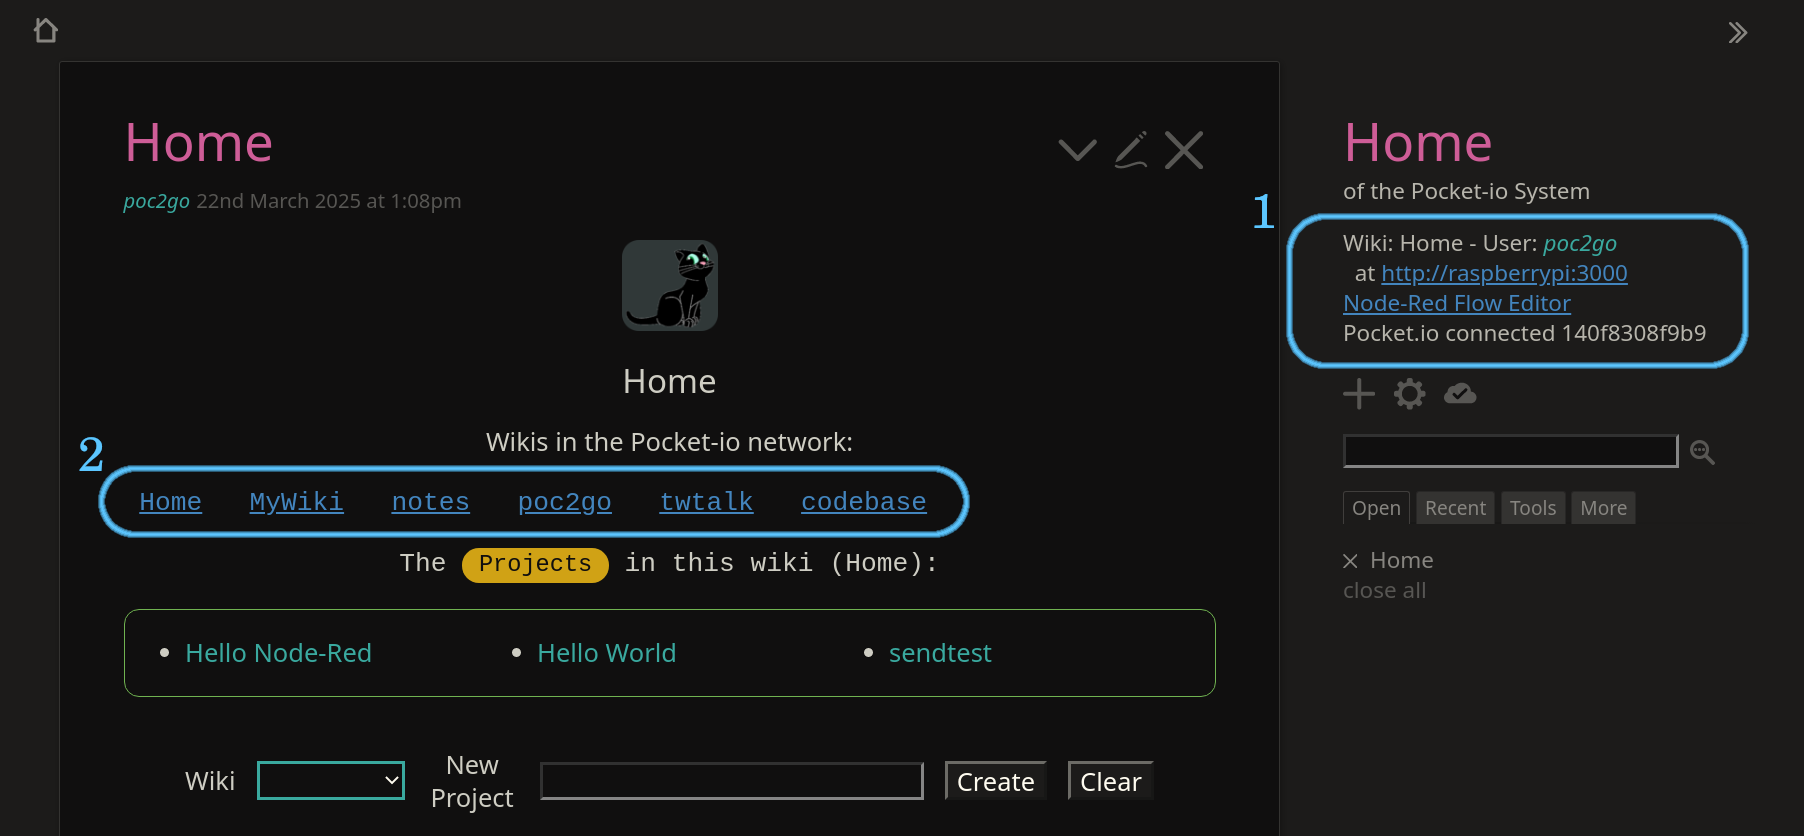
The goal is to have wikis interact with in Node-Red in a simple manner:

After cloning and npm install - the npm start will display a summary of the configuration settings -

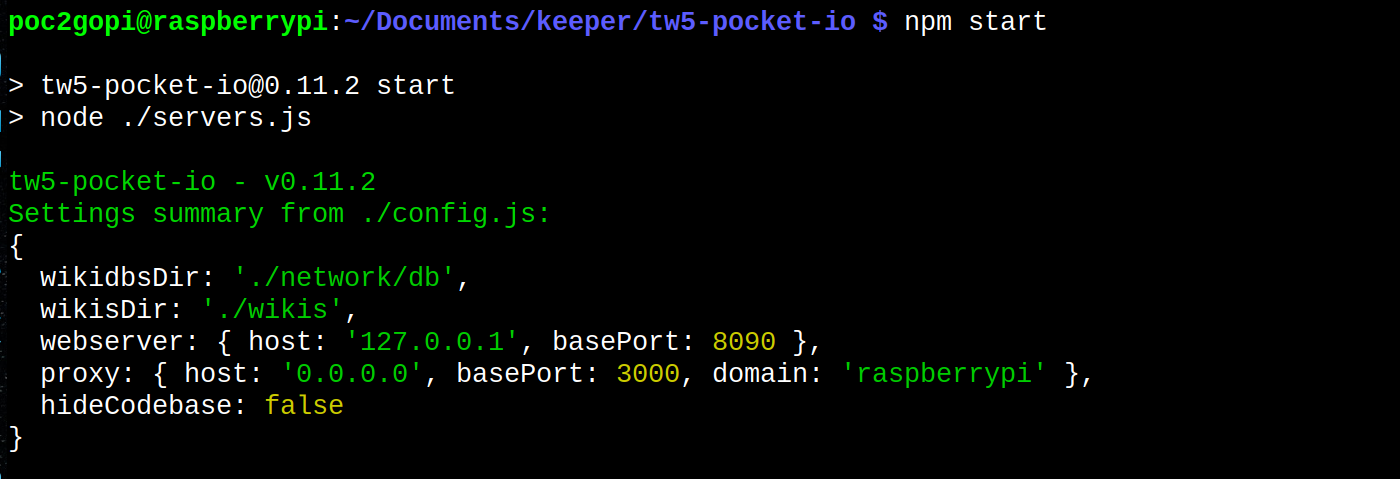
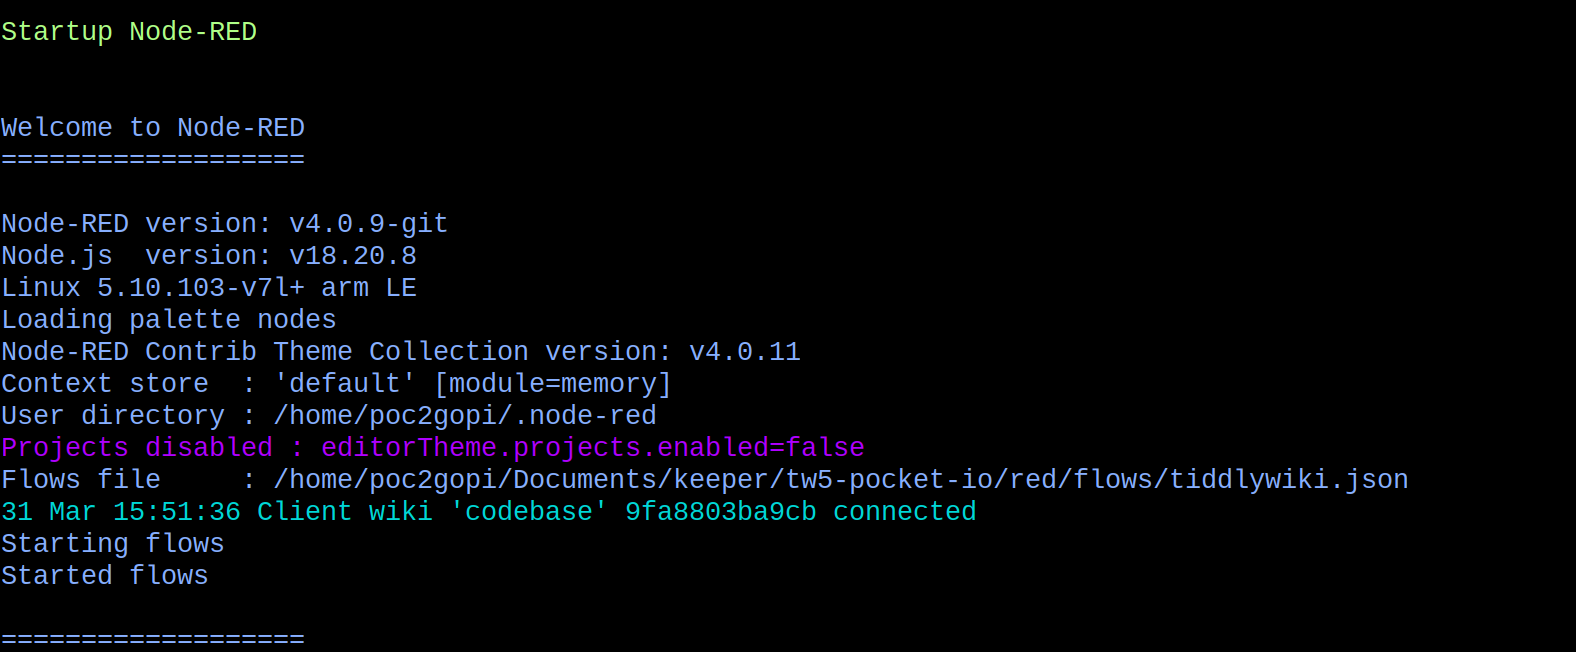
The next display is the startup summary -

This informs of the ‘hostname’ on the local network which wikis are available. In this case am running on my ‘raspberrypi’ machine - which is accessable from network devices by ‘http://raspberrypi:xxxx’ - xxxx being the port.

This will be followed by the startup of ‘TiddlyWiki databases’. These are wikis which you can use to store records(tiddlers) to be used by your applications. This is optional - the install has two databases as examples - connections and users - they are not used.

The next section to startup are the webservers that are available to the system. Copy ‘server’ edition wikis into the `./wikis’ directory and they will startup as part of the Node-Red network. Each wiki has it’s own port - starting from a base port and incrementing by one for each webserver -

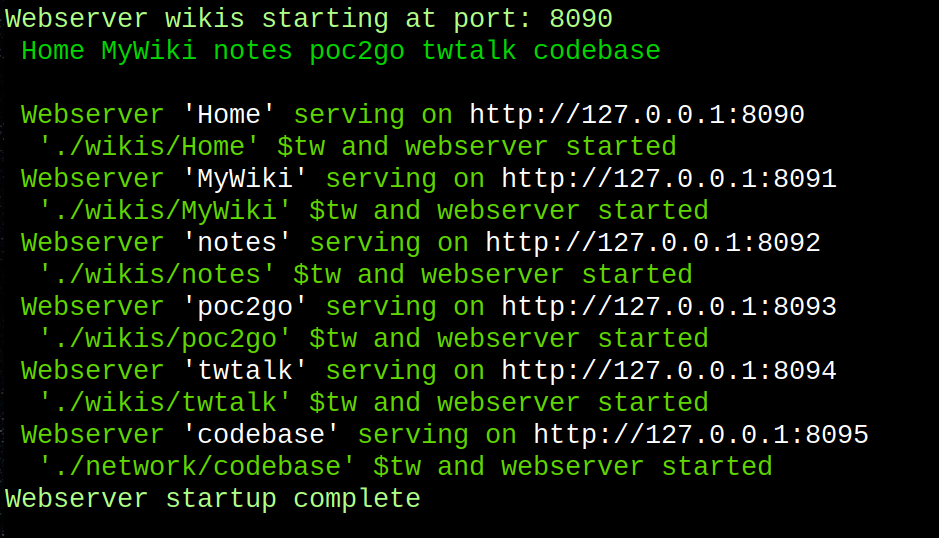
Notice these TW webservers startup are ‘localhost’ - as shall see later users of the webservers (clients) do not directly access them.

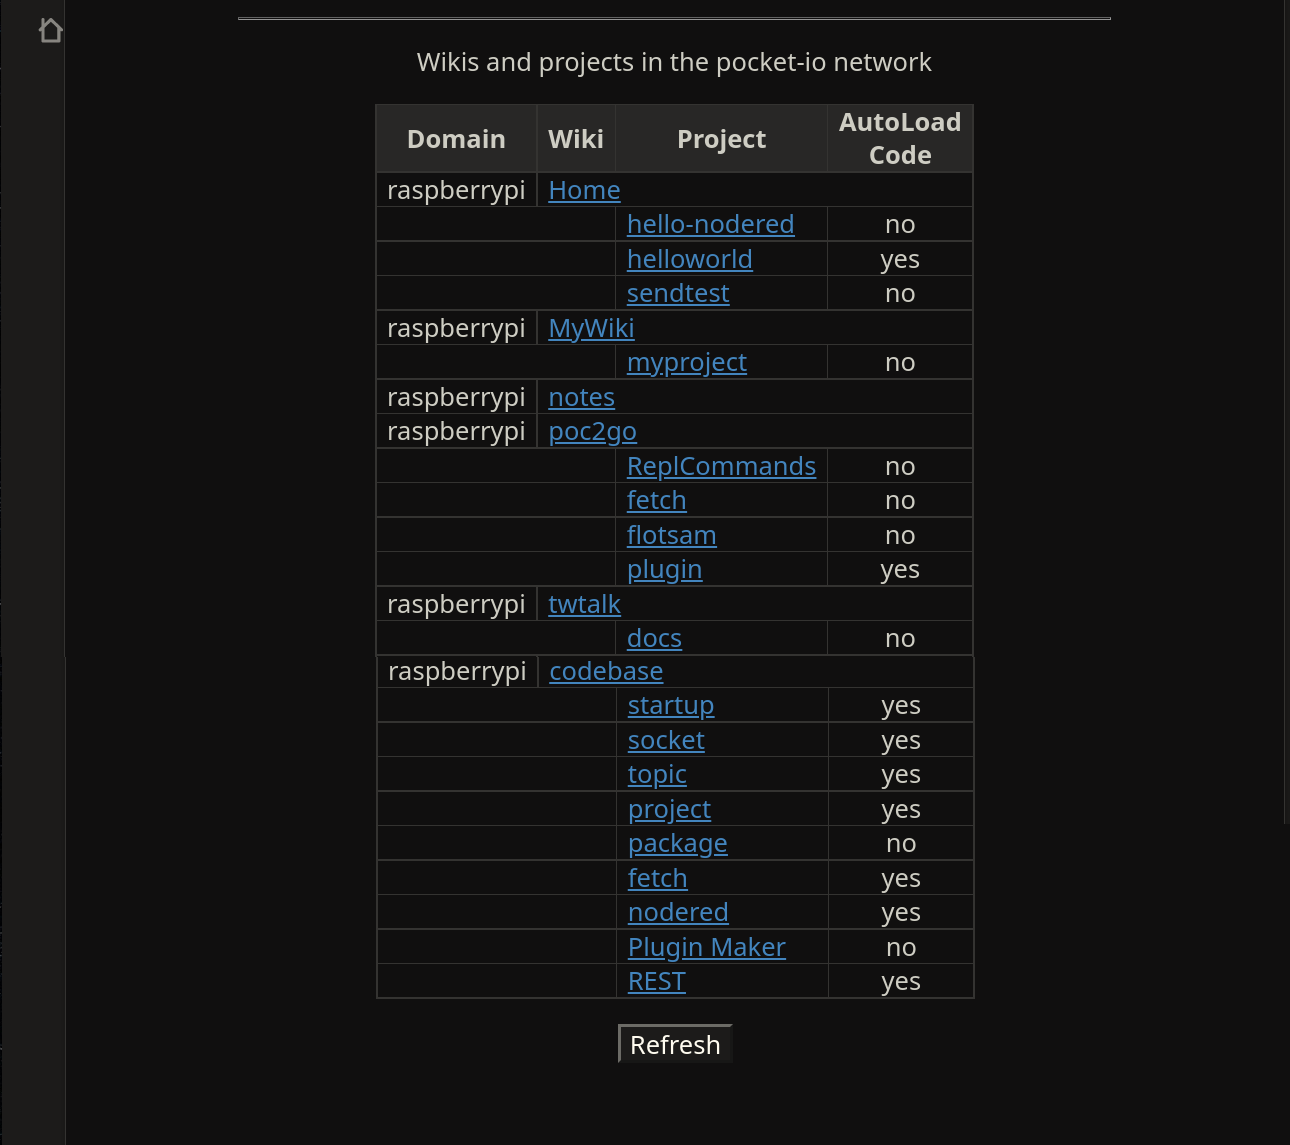
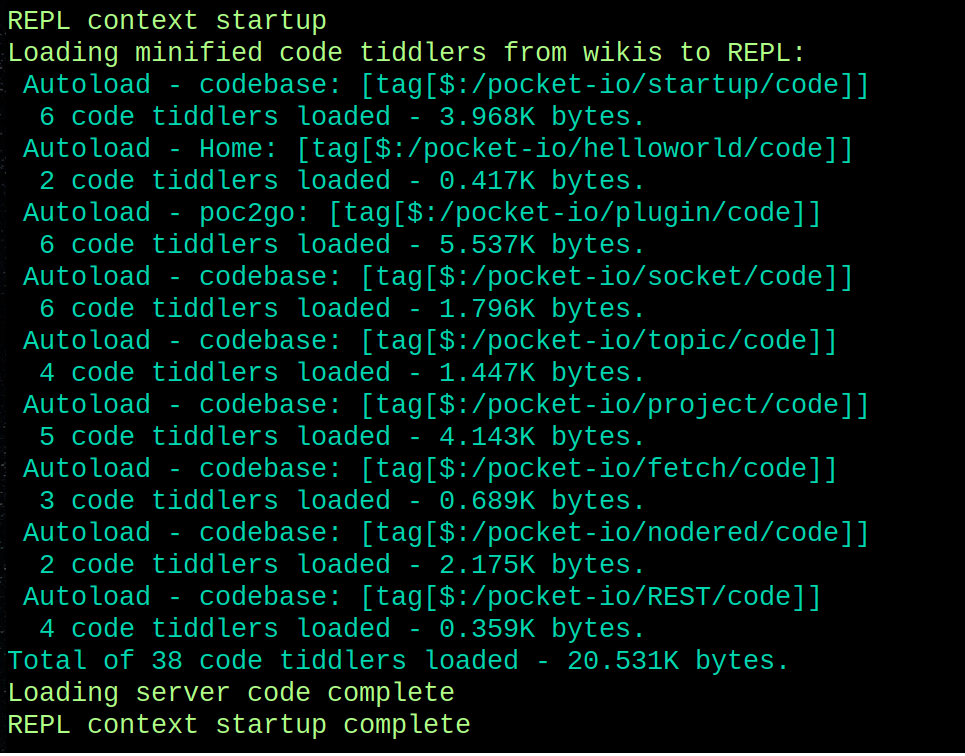
Next the server Javascript code is loaded. The code comes from tiddlers - is similar to other module loaders ( CJS, ESM, AMD, etc) but loads from tiddlers instead of files. Thus one writes Javascript code and stores as tiddlers. To use Node-Red, the server code is already done, unlesss have specific application stuff needed -

The next section of the startup are the proxy servers to the ‘webservers’ above. The interface to the system are TW webservers, however, they are accessed via a zero-config reverse proxy server. The proxy server is an expressjs server which can have additional routes prior to sending requests to thw webserver - the REST project included in the system is an example of a RESTful interface provided by the prox(ies) -

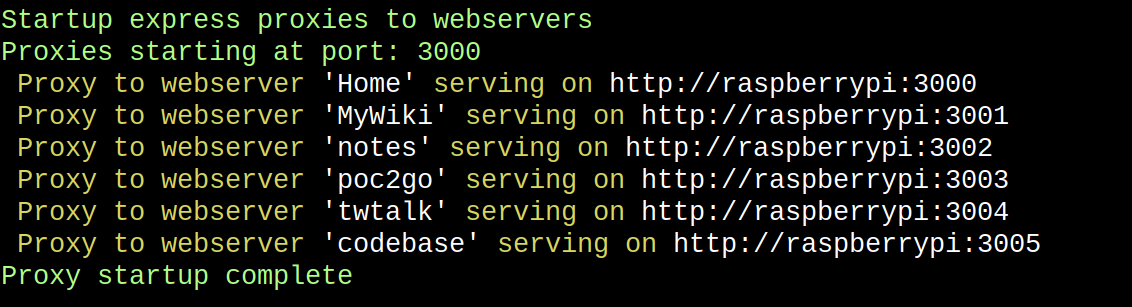
Generally, the proxies are host=0.0.0.0 so devices on the local network can access the webservers via the proxies.

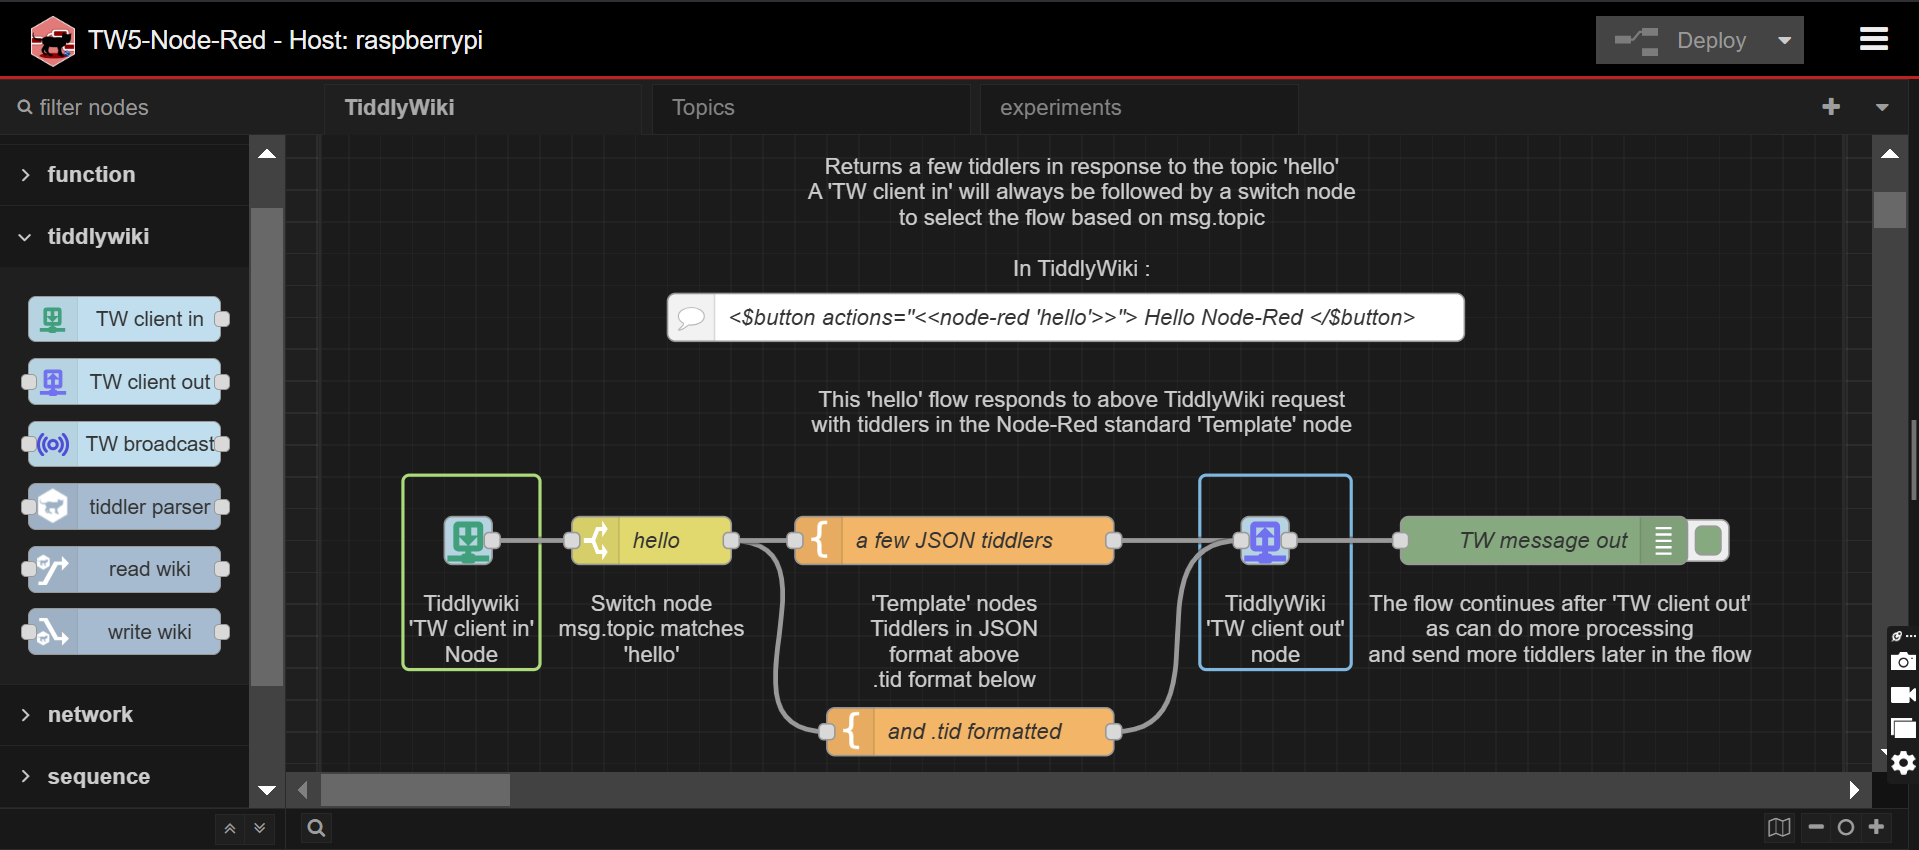
Finally, Node-Red comes up. Node-Red nodes have access to the complete system (such as all config, settings, $tw.uils/$tw.wiki/etc) for each webserver -

4 Likes

Assume you have not changed the ./config.js in the project directory for the following links to work - all permalinks can be re-configured via ./config.js - so (of course) changing them - changes the links.

Access to Node-Red flow editor

The system uses the Node-Red standard settings.js file in your User directory .node-red directory. Thus any credentials or modules you have installed into Node-Red will be available in the Node-Red flow editor.

The Node-Red Flow Editor has a link displayed in the upper-right of the Webserver (see below) for each wiki in the network. If your Node-Red settings file has credentials enabled - users will be prompted for user/password to be allowed access to the Flow Editor. Is all standard Node-Red stuff.

Adding a wiki to the pocket-io network

Note:

The wiki directory name should conform to the format allowed as a Javascript variable name - letters, numbers, underbar, dollarsign. (ie: no spaces or dashes)

This is not actually a requirement, but the wiki directory name is used to reference the wiki in the pocket-io network as a Javascript object.

So as a developer - save yourself A LOT!!! of grief and have the directory name of the ‘server’ edition wiki in the ./wikis folder short , descriptive, and concise - ‘WikiOfKnightsThatSayNee’.

Adding a wiki to the network is pretty simple.

  1. Copy an existing ‘server’ edition directory into `./wikis’ directory
  2. Create a new wiki using the TiddlyWiki --init command

1) Copy an existing ‘server’ edition

If you already have a ‘server’ edition wiki - just copy that directory into the project .\wikis folder. Restart the system (‘npm start’) and the wiki will be included in the network.

2) Create a new wiki

From the project directory can use the standard tiddlywiki ‘–init’ command to create a new '‘server’ edition wiki

tiddlywiki ./wikis/NewWiki --init server

Restart the system (‘npm start’) and the wiki will now be available to users.


Default wiki in the pocket-io network

The ./config.js file in the project directory has an option ‘defaultWiki’. This is the wiki that will be displayed first in the client list of wikis. It generally would be the wiki that new users to your app would visit first.

Assuming ./config.js is not modified, by default the ‘Home’ wiki is at address http://{domainName}:3000.

If you are running a browser on the same machine the project is installed - then ‘localhost’ can be used as ‘{domainName}’. Though the system will automatically assign the host name of the running computer so other devices on the local network have access.

For example: If your computer’s name is ‘win-does’ - then links will be generated as http://win-does:3000 - thus devices on the local network have access to the wikis.

Access the network

The default install has a wiki named ‘Home’ in the ./wikis directory so it is on the network. - go to ‘http://localhost:3000’ and should see -

In the sidebar (#1) of the TW Webserver will see information about the wiki you are viewing. The wiki name, the TW User, link to to wiki you are viewing, link to the Node-Red Flow Editor, and the connection ID to the server.

A list of all the wikis in the network are displayed (#2). Clicking on the name of the wiki will open that wiki in the browser.

If you scroll down will see all of the wikis in the network, and the projects which those wiki’s contain -

More about projects later - they are a way of organizing all of the components of your application.

1 Like

Credentials

The system uses the credential settings of Node-Red for both the flow editor and node level credentials. For the TW Webservers TiddlyWiki settings are used.

Node-Red Flow Editor credentials is documented at Editor & Admin API security while individual node credentials is at Node credentials.

Node-Red has both Basic and OAuth built-in. Whatever credentials you have set up in your Node-Red settings.js file will be used.

For TiddlyWiki, the system uses the WebServer Basic Authentication for each ‘server’ edition wiki in the ‘wikis’ directory. This is somewhat problematic as each wiki has it’s own CSV file WebServer Parameter: credentials of usernames/passwords.

If you have 10 wikis then would have 10 Webservers, each having it’s own CSV file. To maintain the CSV files when adding/changing user permissions for the wikis is burdensome. Webservers sharing the same CSV file is not feasible as more than likely users will have differing access permissions depending on the wiki.

TW5-Node-Red config.js file has a credentials section which will generate the credentials, WebServer Authorization parameters, and CSV files for each wiki based on the settings.

By default a User/Password file and CSV files are stored in your user directory .tw5-node-red (note the ‘dot’) sub-directory. This keeps the credential information separate and remain unchanged between release updates.

To recreate the credentials, delete them from the .tw5-node-red directory. Credential parameters and files are automatically recreated if not present on system startup.

1 Like

Projects

There are two differing ‘project’ systems - there is an optional ‘Project Management’ system that can be used with-in a networked wiki to help in building that wiki’s dashboard, documentation, TW GUI templates, and the wiki’s JavaScript code to be uploaded and run on the server.

There is also a lower level NPM ‘Project’ directory which contains the credentials, webserver wikis, wiki databases, Node-Red flows and configuration settings that are unique to your application. Thus your application is kept separate from the TW5-Node-Red project itself, making your project more ‘tolerant’ of tw5-node-red release updates.

The default Project directory is in the user’s .tw5-node-red folder. If it does not exist, will be created on startup with the wikis and stuff of a fresh TW5-Node-Red install. Generally, would make changes in .tw5-node-red to customize settings and wikis of your application.

The folder contains the normal NPM project structure; a basic package.json, README.md, .gitignore, credentials, and directories containing your client ‘wikis’, ‘dbs’ wiki databases, and Node-Red ‘flows’ for your tw5-node-red project. You can have multiple Project directories which can be easily setup to upstream to GitHub - Add existing project to GitHub.

The .tw5-node-red Project is used by default on startup. A different Project directory can be specified using the command line (’-p’) option.

System functionality

The infrastructure to startup the system resides in the tw5-node-red ./lib directory. It is not expected that JavaScript code in ./lib will be modified (with the exception of bug fixes) - as most of the server code comes from JavaScript tiddlers contained within in your wikis.

The ‘codebase’ wiki (located in ./network/codebase) is always loaded upon startup. It is the code that is required for the system to operate.

Any wiki in the network is capable of uploading JavaScript code to the server to add application specific features. Can be done manually or automatically, minified or verbatim (helpful to track bugs during development). Other than a few edge-case exceptions, code changes are dynamic and take effect immediately upon upload.

The most common method of adding unique functionality to your application is to create a Node-Red flow, function node, or sub-flow. It is dynamic with the changes taking effect immediately upon deploying changes made in the Node-Red Flow Editor.

The system has three client-side and three server-side places to implement application specific functionality.

  • Client-side
    1. TW macro ./public/tw5-pocket-io-network.js.tid.
      • Is automatically added/updated into every wiki in the network
      • Changes to this macro requires a re-start
        • (TiddlyWiki JavaScript macros require a restart)
      • Implements a websocket (out-of-band) channel to the server
        • bi-directional - allows server to send commands to clients
          • for ex: have clients ‘refresh’ after it’s wiki is updated
        • client access to other wikis in the network
        • client-to-client communications
        • client messages to/from Node-Red
      • Over the years - this guy is pretty much rock solid.
    2. Pocket-io (and optional supporting) plugins
      • Automatically added to every wiki in the network
      • Provides individual client-side settings
        • (controlpanel → settings)
      • TW GUI templates for client dashboards
    3. Plugin Maker
      • Optionally, can automatically add any plugin to all wikis in network
        • (plugin must exist in ‘codebase’) - see below
      • TW browser based plugin maker
      • Create application specific plugins
         
  • Server-side
    1. JavaScript modules in ./lib brings the system up
      • Rarely changed unless adding a new design element to the system
    2. ‘codebase’ wiki JavaScript tiddlers adds global, required, and commonly used code to the server
      • Can be ‘hidden’ and unaccessable by users
      • Any plugin in ‘codebase’ can be automatically loaded to all wikis in the network.
        • If plugin updated - updates all wikis in network
      • Independent of Node-Red - always loaded
      • Message handlers between clients, Node-Red, server topics, client-to-client
      • Add express routes to proxy servers
    3. Node-Red flows and functions add application specific functionality
      • Most common place to add code to server
      • Dynamic - add flow then deploy - immediately implemented
      • Node-Red has complete access to all objects of system
        • config, settings, Webserver $tw instances, proxies, etc.
1 Like

Hi @poc2go this looks impressive, thank you for all the work. Could you add an entry that shows possible use cases for the setup. That would make it easier for those unfamiliar with node-red to understand the project.

Hi @JanJo,

Am feverishly finishing off the code - which is so close to release. But, as usual the release is pending on writing the documentation - I can code anything - but documenting it is a major challenge - a tech writer I am not.

I will be providing an example of a ‘project’ system and a more advanced ‘shopping cart’ system using TiddlyWiki as a front-end with server-side written using Node-Red flows. Also a silly IoT application that publishes the current temperature of your refrigerator/freezer ( some inexpensive hardware required ).

Node-Red is actually an optional add-on, and not required to run the system. My main personal use is to run the system on a ‘Raspberry Pi Zero 2W’ which is a small microcomputer powered off of a USB port. It allows adding a bunch of TiddlyWiki ‘server’ edition wikis to be viewed as a single ‘network’ of wikis, can be carried in my pocket, and allows me to open any wiki in the network, create new wikis, easily copy tiddlers between them, etc.

However, the audience of the Node-Red part of the system is more focused on users of Node-Red - who might be new to TiddlyWiki; so TW5-Node-Red will hopefully be of interest in their forums. Node-Red is the place to go for building IoT applications.

The system provides them with a more advanced ‘dashboard’ based on TiddlyWiki instead of their current, ageing, and unsupported Angular based dashboard.

TW5-Node-Red gives Node-Red full access to the TiddlyWiki core JavaScript functions, and will hopefully expand the TiddlyWiki user base to include the world of Node-Red and IoT.

3 Likes