Disclaimer: I am not an expert, so please proceed with caution and back up your Raspberry Pi before attempting this. If you have more knowledge on the subject, please contribute and edit this post! I am using Windows, so your experience may vary if you’re on a different operating system.
TiddlyPWA — TiddlyWiki Storage & Sync Solution (packett.cool) is an awesome way to sync your wiki accross multiple devices, almost in real time. You can use Glitch to host a server for free, but Glitch apps are slow to wake up and have a limited storage capacity. In this post, we’ll see how to host our own server on a Raspberry Pi 5, and how to access this server from anywhere in the world.
Table of contents
- Installing Raspberry Pi OS Lite on the RP5
- Installing deno on the RP5
- Setting up TiddlyPWA Sync Server
- Automatically power cycle the Raspberry Pi once it gets stuck
- Making your server public
- Limitations of cloudflare tunnel
Installing Raspberry Pi OS Lite on the RP5
Note: I’m using a RP5 because that’s what I have, but you could probably use a Raspberry Pi Zero 2 W, or any similar alternative like Orange Pi & co
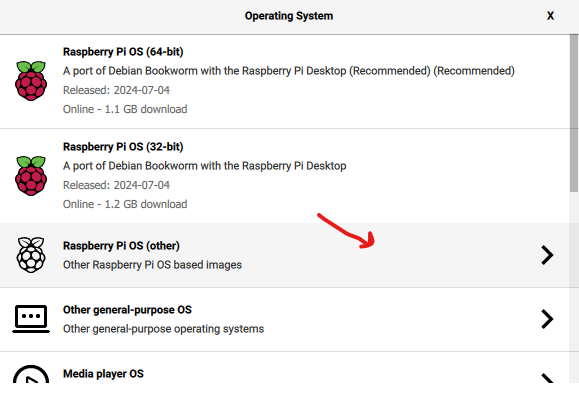
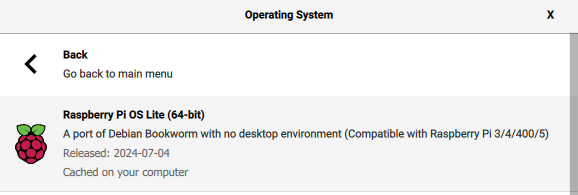
- Flash your sd card or external usb hard drive with Raspberry Pie imager. I used Raspberry Pi Os Lite (64-bit):
- Use OS customisation to enable SSH access to the pi:
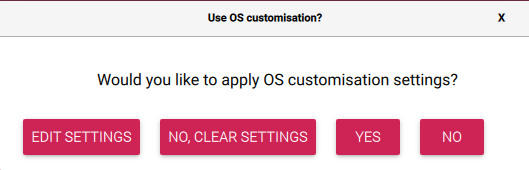
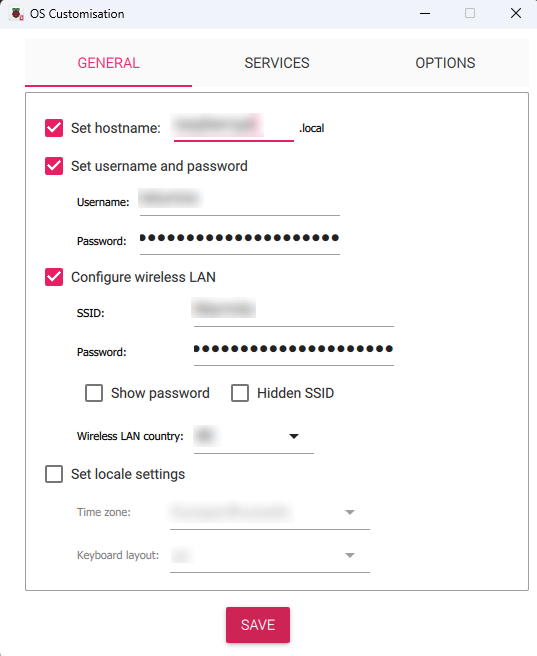
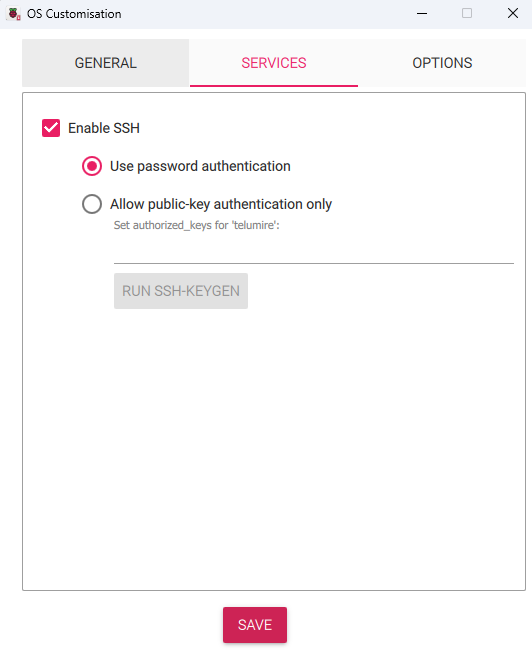
Then Save.
When you turn on the pi, it should automatically connect to your local network and be accessible with PuTTY or any other SSH client. I also like to use WinSCP to browse the files on the pi more easily, but you don’t need it for this tutorial.
Installing deno on the RP5
Use PuTTY from the command line as usual, or create a shortcut for quick access:
- Create a shortcut on the desktop to putty.exe
- Rename it if you want
- Right click > Properties
- Modify the target similar to:
"C:\Program Files\PuTTY\putty.exe" ******@raspberrypi -pw "******" - Click OK
If your version of PuTTY does not support the pw parameter, you will need a public key.
Tip: to copy text on the PuTTY CLI, select the text with your mouse, then right click to paste.
Install deno on the pi:
curl -fsSL https://deno.land/install.sh | sh
Once installed, you need to add the installation directory of Deno in your system’s PATH. Open your shell configuration file:
nano ~/.bashrc
Add this to the end of the file:
export PATH="$HOME/.deno/bin:$PATH"
Save and close the file, then reload the configuration:
source ~/.bashrc
Check if deno is correctly installed:
deno --version
Setting up TiddlyPWA Sync Server
Create a folder for the server database:
sudo mkdir -p /var/db/tiddly/
Change the ownership of the directory to the user logged in (replace login with your username):
sudo chown login:login /var/db/tiddly/
Decide on an admin password and hash it :
deno run https://codeberg.org/valpackett/tiddlypwa/raw/branch/release/server/hash-admin-password.ts
Create a systemd service to run Deno automatically when the Raspberry Pi starts:
sudo nano /etc/systemd/system/tiddlypwa.service
Paste the following configuration in the file:
[Unit]
Description=TiddlyPWA Service
After=network.target

[Service]
# Use the appropriate user, e.g., `pi` if you are running this as the default Raspberry Pi user
User=pi

# Hash and salt setup during the installation of the tiddlywiki pwa server
Environment="ADMIN_PASSWORD_HASH=......."
Environment="ADMIN_PASSWORD_SALT=......."
Environment="DB_PATH=/var/db/tiddly/pwa.db"
ExecStart=/home/pi/.deno/bin/deno run --unstable-broadcast-channel --allow-env --allow-read=/var/db/tiddly --allow-write=/var/db/tiddly --allow-net=:8000 https://codeberg.org/valpackett/tiddlypwa/raw/branch/release/server/run.ts
Restart=always
RestartSec=10

[Install]
WantedBy=multi-user.target
- Replace
/home/pi/.deno/bin/denowith the correct path to the Deno executable if different. - Change
User=pito the user under which you want the service to run.
After saving the service file, reload the systemd manager configuration and enable the service to start on boot:
sudo systemctl daemon-reload
sudo systemctl enable tiddlypwa.service
Start the service immediately to test it:
sudo systemctl start tiddlypwa.service
Check the status of the service to ensure it is running correctly:
sudo systemctl status tiddlypwa.service
This should run your Deno command every time your Raspberry Pi boots up. If there are any issues, you can check the logs using:
journalctl -u tiddlypwa.service -f
At this point, the TiddlyPWA server should be accessible on your local network by entering in a web browser the url : raspberrypi:8000.
Automatically power cycle the Raspberry Pi once it gets stuck
source: Running forever with the Raspberry Pi Hardware Watchdog | Diode™
Occasionally, the Pi may become unresponsive and freeze. To resolve this, you can manually power cycle the device by turning it off and then on again, or you can use the built-in hardware watchdog to reboot it automatically.
- Enable the hardware watchdog on your Pi and reboot
sudo su
echo 'dtparam=watchdog=on' >> /boot/config.txt
reboot
- Install the watchdog system service
sudo apt-get update
sudo apt-get install watchdog
- Configure the watchdog service
sudo su
echo 'watchdog-device = /dev/watchdog' >> /etc/watchdog.conf
echo 'watchdog-timeout = 15' >> /etc/watchdog.conf
echo 'max-load-1 = 24' >> /etc/watchdog.conf
echo 'interface = wlan0' >> /etc/watchdog.conf
- Enable the service
sudo systemctl enable watchdog
sudo systemctl start watchdog
sudo systemctl status watchdog
Now next time your Pi freezes or the WiFi interface wlan0 gets into trouble, the watchdog will restart it automatically after 15 seconds.
Making your server public
To make the server accessible outside of my local network, I used cloudflare tunnel. Note that this require a domain name. You can get a free or cheap domain name with one of these services:
- https://nic.eu.org : free subdomain registration to users or non-profit organizations who cannot afford the fees demanded by some NICs. See this tutorial. Note that I tried to create a account for myself but it didn’t work.
- https://gen.xyz/1111b : affordable class of .xyz domains for 99¢ per year, every year. The domain name can be made up of 1.111 billion possible 6-digit, 7-digit, 8-digit, and 9-digit numeric combinations, between ‘000000.xyz’ through ‘999999999.xyz’.
- free-domain · GitHub Topics · GitHub : you might be able to find other good alternative here.
- If you already have a domain name, you could setup cloudflare tunnel on a subdomain: How to set a second cloudflare tunnel to my subdomain? - Website, Application, Performance / Getting Started - Cloudflare Community
You can also instead create a “Quick Tunnels” without domain name, but there are limits: Quick Tunnels | Cloudflare Zero Trust docs. The server won’t be able to handle more than 200 in-flight requests, which I guess should be enough for a small wiki. See TryCloudflare.
I followed this tutorial to set it up: Setting up a Cloudflare Tunnel on the Raspberry Pi - Pi My Life Up
Don’t forget to redirect users to https, otherwise tiddlywiki pwa will not function correctly: Always Use HTTPS | Cloudflare SSL/TLS docs
Limitations of cloudflare tunnel
If your network is unstable / or overloaded, the tunnel will not be able to connect to your deno server. This happened to me while I was syncing files with google drive, so be mindfull of that.
Cloudflare Tunnel seems to have a upload limit somewhere between 1.2MB and 1.4MB, at least on my network. I don’t know how to increase this limit, so try to keep the App File light (avoid uploading a lot of plugins all at once).
Conclusion
And that’s it! You should now be able to access to your own TiddlyPWA server from any device. Enjoy!