ListWidget: table output and line wrap after n items?

Hello community,

I need your thoughts here, please:
Items are read in from a plain text tiddler, line by line.

item1
item2
item3
item4
...
item14
item15

Each item is used as a label for a checkbox-widget and I’d like to force a new table row after 5 items.
Here is a simplified code without the checkbox-widgets. Unfortunately, the </tr>-tag is interpreted as plain text instead of a HTML tag.

<table><tr>
<$list filter="[{data:Customers}splitregexp[\n]]" counter="count">
<% if [<count>remainder[5]match[0]] %>
<td><<currentTiddler>></td></tr>
<% else %>
<td><<currentTiddler>></td>
<% endif %>
</$list>
</tr></table>

Output:

I’m sure that there is a simple solution for this, but I don’t see the wood for the trees :thinking:

Try to treat widgets (including the conditional syntax which is essentially a $list widget) as if they were html tags, adhering to the same hierarchy and nesting rules. In your example you do something like

<table>
  <tr>
    <$list>
      <$list (if)>
        <td>...</td>
        </tr>
...    

The closing </tr> is deep inside the list widgets, not on the same level as the opening <tr>, so it is not interpreted properly.

I see two possible solutions.

One. Build the table row by row. Outer $list widget counts items by groups-of-five, then $list widget in a row lists individual items in this row:

<table>
  <$list filter="count items, divided by five" variable="n starting at 1">
    <tr>
      <$list filter="items (5n - 4) through (5n)">
        <td>...</td>

Two. Use one $list that lists all the items. Arrange them in a desired number of columns by using flexbox instead of a table. I don’t have much experience with flexboxes so I can’t help you further.
This feels like a more flexible (pun intended) way to go than the table approach.

3 Likes

Thank you @vilc, your draft of solution 1 pointed me into the right direction.

I suspected that my opening and closing of tags was unbalanced, but I couldn’t find another solution at this time.
At first it gave me a little headache to find a “counting loop” for my problem, but I found the key in the range operator at last to build a proper filter.

Maybe solution 2 is the better and even more elegant solution, but unfortunately I’m also not familiar with flexboxes. So I ended up building a classic table layout and filled up the empty cells.

<$let rowcount="5">
  <table>
	<$let items={{{ [{dataItems}splitregexp[\n]count[]] }}}  lines={{{ [<items>divide<rowcount>trunc[]add[1]] }}} full={{{ [<lines>multiply<rowcount>] }}} >
      <tr><th colspan=<<rowcount>>>Items: I:<<items>>/F:<<full>>/L:<<lines>></th></tr> 
      <$list filter="[range[1],<items>,<rowcount>]" counter="count">
		<$let cStart=<<currentTiddler>> cEnd={{{ [<cStart>add<rowcount>subtract[1]] }}}> 
		  <tr>
	        <$list filter="[{dataItems}splitregexp[\n]]" counter="index">
		      <% if [<index>compare:integer:gteq<cStart>then<index>compare:integer:lteq<cEnd>] %>
		        <td><<currentTiddler>></td>
		      <% endif %>
		    </$list>
		    <% if [<items>!match<full>then<count>match<lines>] %>
		      <$let start={{{ [<items>add[1]] }}} >
		        <$list filter="[range<start>,<full>]" counter="cnt">
		          <td></td>
		        </$list>
		      </$let>
		    <% endif %>
		  </tr>
	    </$let>
	  </$list>
	</$let>
  </table>
<$let>

Data tiddler:

item1
item2
item3
item4
item5
item6
item7
item8
item9
item10
item11
item12
item13
item14
item15
item16
item17

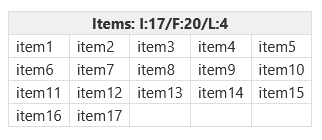
Output:

grafik

1 Like

One suggestion. ceil[] is more appropriate than trunc[]add[1]. It’s not a big deal, but if your number of entries is a multiple of five, with trunc, you will end up with an extra table row full of empty cells.

2 Likes

[edit]Updated code and text after using ceil as Scott suggested[/edit]

Thank you Scott, good point and you are right.
Currently it is working by accident, because the counters for a full pattern and therefore for total lines, too, are being miscalculated.
Therefore the trigger doesn’t create an empty row because it is one number too high.

I will give it a try to debug it and use the ceil operator instead.

Enhanced the code with a range widget to show the problem.
In the header the letters are
I for items,
F for full pattern and
L for total lines.

Items in row: {{!!rcnt}} <$range field="rcnt" min="1" max="10" default="1" increment="1" default="5"/>

<$let rowcount={{{ [{!!rcnt}match[]then[5]else{!!rcnt}] }}} >
  <table>
	<$let items={{{ [{dataItems2}splitregexp[\n]count[]] }}}  lines={{{ [<items>divide<rowcount>ceil[]] }}} full={{{ [<lines>multiply<rowcount>] }}} >
      <tr><th colspan=<<rowcount>>>Items: I:<<items>>/F:<<full>>/L:<<lines>></th></tr> 
      <$list filter="[range[1],<items>,<rowcount>]" counter="count">
		<$let cStart=<<currentTiddler>> cEnd={{{ [<cStart>add<rowcount>subtract[1]] }}}> 
		  <tr>
	        <$list filter="[{dataItems2}splitregexp[\n]]" counter="index">
		      <% if [<index>compare:integer:gteq<cStart>then<index>compare:integer:lteq<cEnd>] %>
		        <td><<currentTiddler>></td>
		      <% endif %>
		    </$list>
		    <% if [<items>!match<full>then<count>match<lines>] %>
		      <$let start={{{ [<items>add[1]] }}} >
		        <$list filter="[range<start>,<full>]" counter="cnt">
		          <td></td>
		        </$list>
		      </$let>
		    <% endif %>
		  </tr>
	    </$let>
	  </$list>
	</$let>
  </table>
<$let>

dataItems2:

item1
item2
item3
item4
item5
item6
item7
item8
item9
item10
item11
item12
item13
item14
item15

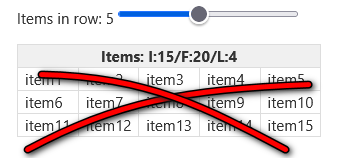
Output (OLD!)

grafik

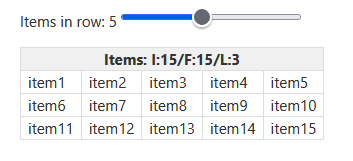
Updated output, please note the correct counters for full pattern (F) and lines (L) in the table header:

grafik

1 Like

In my test (Dev Tools > Inspect), there was an extra <tr> full of empty <td>s. But because everything was empty, it didn’t show.

But I think you can do this more simply. @vilc suggested flexbox. I’m not sure that will work, although it could well be possible. But css-grid definitely will.

In your main tiddler:

<div class="my-grid">
<div class="header">Header here</div>
<$list filter = [{dataItems}splitregexp[\n]]><div><<currentTiddler>></div></$list>
</div>

In your stylesheet:

.my-grid {
  display: inline-grid;
  grid-template-columns: repeat(5, auto);
  &>div {border: 1px solid #ddd; padding: 0 7px;}
  &>div.header  {background: #f0f0f0; font-weight: bold; text-align: center; grid-column: 1/6}
}

And that’s it.

Ideally some of those CSS values would come from references to your theme stylesheet, and not hardcoded 7px, #f0f0f0, etc. But that’s a small refinement.

Your screenshots have a dynamic header and a slider for what you call rowcount (which I would much prefer to call columns or column-count!). We can do that by making parts of the CSS dynamic. I would move .my-grid {grid-template-columns: repeat(5, auto);} and .my-grid >div.header {grid-column: 1/6} out of the general stylesheet and inline them in the markup, replacing the 5 with a reference to rowcount and the 6 with one more than that, keeping the rest of the general stylesheet intact. And I would do the dynamic header calculation just as you already are.

That would look like this:

title: Table Using CSS Grid
rowcount: 5

''Items in row: <$range field="rowcount" min="1" max="15" default="5" increment="1"/> {{!!rowcount}}''

<$let items={{{ [{dataItems}splitregexp[\n]count[]] }}}  lines={{{ [<items>divide{!!rowcount}ceil[]] }}} full={{{ [<lines>multiply{!!rowcount}] }}} >
<div class="my-grid" style=`grid-template-columns: repeat(${[{!!rowcount}]}$, auto);`>
<div class="header" style=`grid-column:1/${ [{!!rowcount}add[1]]}$;`>Items: I:<<items>>/F:<<full>>/L:<<lines>></div>
<$list filter = [{dataItems}splitregexp[\n]]><div><<currentTiddler>></div></$list>
</div>
</$let>

<style>
.my-grid {
  display: inline-grid;
  &>div {border: 1px solid #ddd; padding: 0 7px;}
  div.header  {background: #f0f0f0; font-weight: bold; text-align: center;}
}
</style>
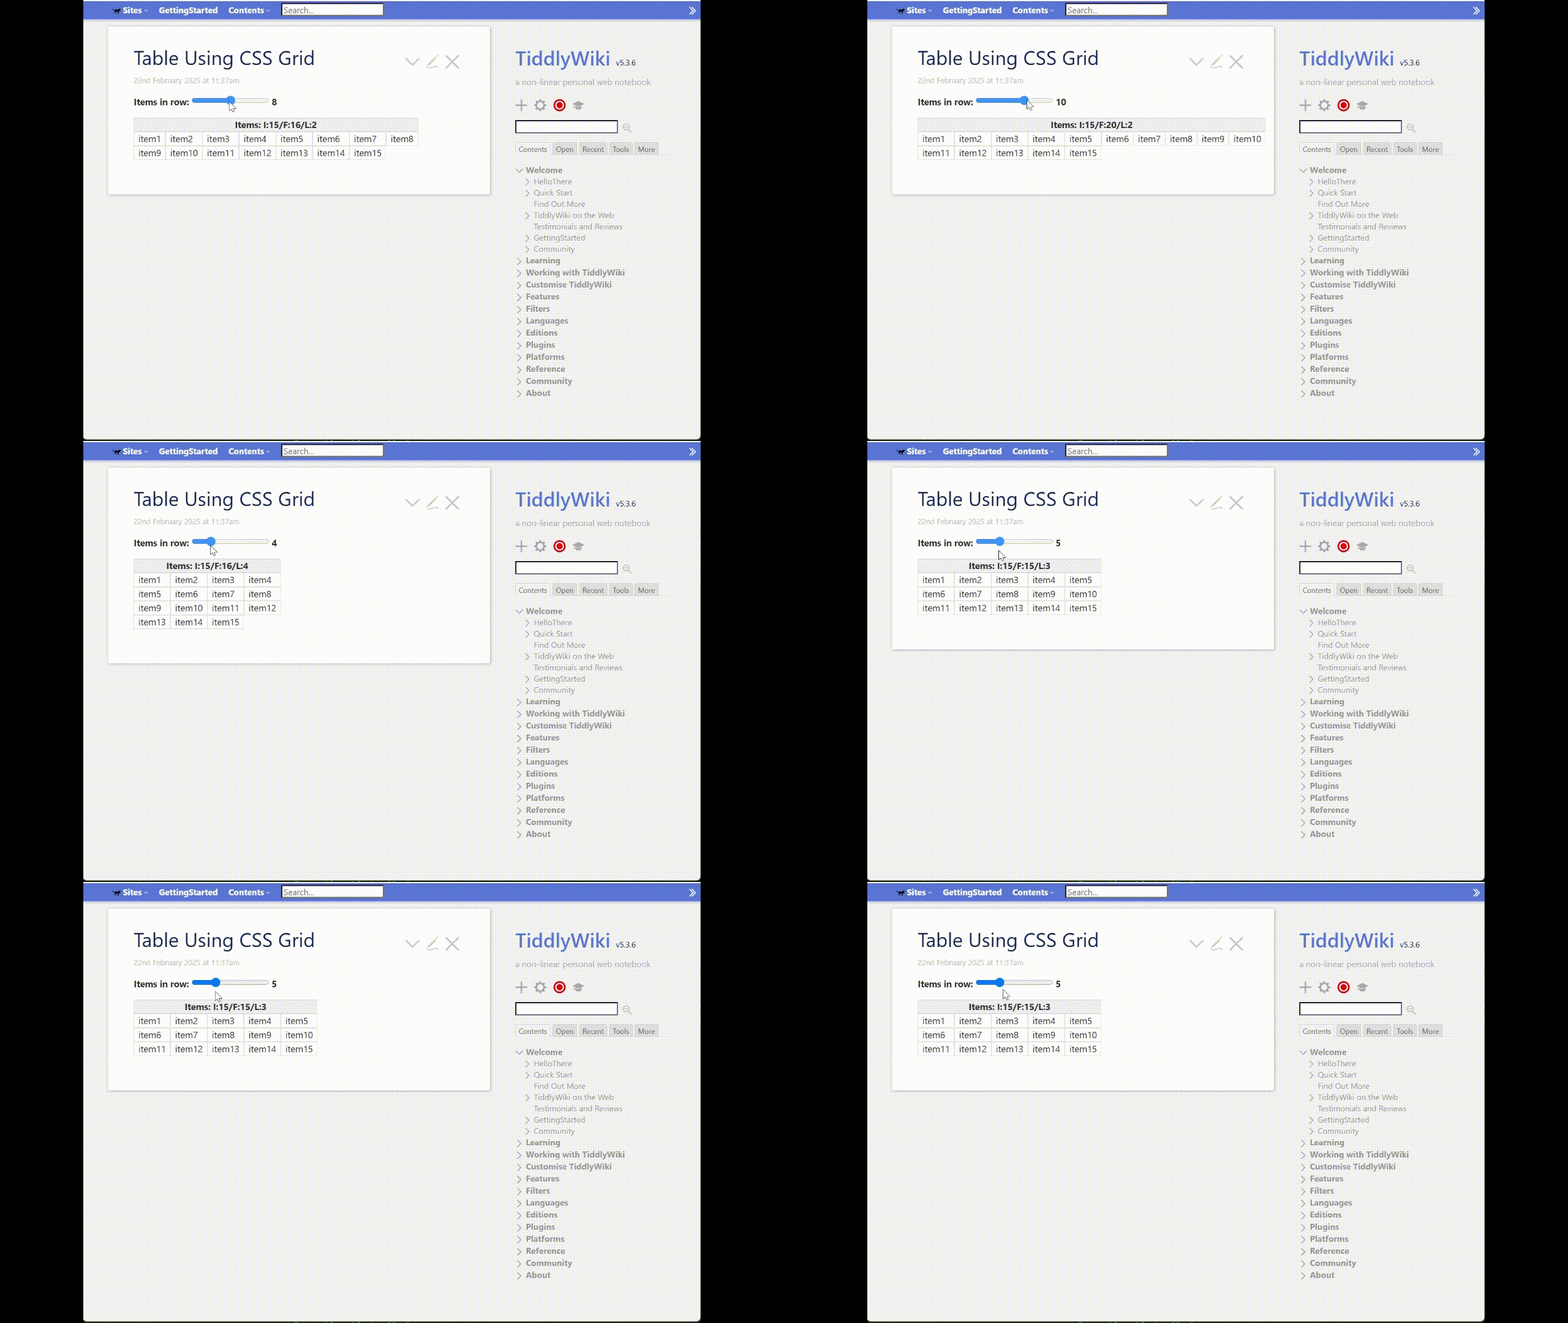
css-grid


You can test by downloading this file and dragging it to a wiki: css-grid.json (1.1 KB)

5 Likes

Quite interesting, I obviously overlooked that…
Thanks for your efforts to point that out and the better approach to solve it with CSS-Grid.

I used that once years ago and have completely forgotten about it since.
It’s a very useful CSS element.
Very nice how you’ve set it up, it’s become a sample article.
I’ve just tried it out, it works wonderfully, thank you very much!

Can you tell me how you created the animated screenshot?

Yes, it’s especially useful at the larger scale of laying out entire pages. But it can cover many other cases.

I was on Windows, and I used the built-in tool, launched with Win-Shift-S That has a companion tool, ClipChamp that allows me to trim the start and end, although the free version seems a bit underwhelming. It has an export-to-gif feature, but I often prefer one of the free online converters. I have similar tools on Ubuntu, but they’re not in front of me now, and I don’t recall the name. My guess is that Mac has better built-in tools, but it’s been a while…

As an alternative to system-specific tools, you can capture window content as a .webm video tiddler by using my TiddlyTools $camera widget with a $button like this:

<$button>&#x1F4BB;<$action-camera device="screen"/></$button>

see TiddlyTools/Camera/action-camera.js and TiddlyTools/Camera/Info

The “video.webm” tiddler is stored as a base64-encoded binary tiddler.

To save the .webm video to a file:

  • View the newly created “video.webm” tiddler and play it once through
  • Right-click on the video and choose “save video as…” from the popup menu

(note: for some unknown reason, on my Windows system “save video as…” seems to be disabled until the video has been played at least once.)

You can, of course, convert the “exported” .webm file to GIF using free online converters, though this might not be necessary, as .webm-formatted video files are already very well compressed.

enjoy,
-e

1 Like

Oh wow! I had seen some discussions of these tools, but assumed from the name “Camera” that it had only to do with phone/tablet cameras. Since I had no current need to work with those, I barely skimmed them. It didn’t work on the most simple test on my work machine. But since so many things are blocked here, that doesn’t mean much. I’ll check from home tonight.

$action-camera works with any combination of four media device sources:

video = images/videos from your device camera
voice = sounds from your device microphone
screen = images/videos from a selected browser tab, application window, or system screen
audio = sounds produced by the selected browser tab, application window or system screen

Some notable features:

  • when using both voice and audio, the sound streams are automatically merged into a single audio stream
  • when using both video and screen, the video stream is rendered as a “picture-in-picture” overlay on the screen capture.
  • you can use $action-camera to create single frame photos and screen snapshots in .webp, .jpg, or .png format as well as video streams and screencasts (.webm format)
  • you can use the actions="..." parameter to invoke “side-effect” handling on the created media tiddler, such as adding tags, renaming the tiddler, etc.

enjoy,
-e

1 Like

I used it mainly for different client layouts in the past, to distinguish between desktop and mobile layouts (like phones and tablets).
But this was years ago and it didn’t come to my mind now, so I’m thankful for your advice.

I see, you were using a Windows built-in-tool.
Interesting tool, which I was not aware of because I don’t use it.
I still use Faststone Capture, a handy tool which I’m using for over 17 years now.
It offers screen recording too, but I rarely use this feature.
There once was a free version also (look for version 5.3), but as a long-time user I switched over to the paid version.

Now this is really interesting!
Didn’t ever imagine that it can be done with TiddlyWiki, too.
Marvellous, I’ll surely give this a try.
Thank you, Eric.